
How do I use the Categorise widget?
How to access the Categorise widget
Widgets are the tools with which course administrators create and build the pages of their courses.
The Categorise widget can be used to create multiple categories in which students must classify a list of words or sentences.
Steps to access the Categorise widget.
Step 1
Go to the page in your course where you'd like to add this widget.
Step 2
Select Edit mode.
Step 3
In the lefthand widget menu, click on the grey container with the word Core and toggle it to Quiz.
Step 4
Click on the Categorise widget icon (or you can hold and drag it wherever you'd like on the page).

Please note that if there isn't a quiz widget on the page, adding a new quiz widget will automatically create a quiz section for you. For more information on how to use the quiz section, please refer to the article How do I use a Quiz Section?
How to set up the Categorise widget
After adding the widget to your page, you can set it up by following the instructions below:
- Click on the Setup tab at the top of the widget.
- Edit the widget settings.

Question text: You can enter a title or instructions for the learners.
Category name: Here you can set up your categories. Enter the category titles within this column. Click on the Add category button to add more categories.
Items in this category: Type in the item name within this field to add an item that belongs to that specific category on the left.

Status Section
Show correct/incorrect status: Ticking this box will allow display text to appear letting learners know if they have selected the correct or incorrect answer(s).
When the answer is correct: You can customise the message to be displayed when the learner has selected the correct answer. The default message is "Correct!".
When the answer is incorrect: You can customise the message to be displayed when the learner has selected an incorrect answer. The default message is "Incorrect! Try again."
Hide correct/incorrect status: Ticking this box will allow you to customise the message to be displayed when the learner has selected the answer regardless of whether it’s correct or incorrect.
Feedback Section

Show feedback (optional): Ticking this box will allow you to customise the feedback message when the learner has selected the correct or incorrect answer for that particular question.

Completion settings
Completing activities on a page is how learners make progress and receive their certificates or complete the course.
As the administrator, you can modify how each Quiz Section tracks this progress.
The completion settings tab in each widget gives the option to include the quiz as part of the quiz section’s progress and completion tracking. By unchecking the option, you are excluding this specific quiz block from being part of the quiz section’s progress. Any interactions with this excluded quiz block will not affect the completion status of the quiz section.

How do the learners answer the question in the Categorise widget
There are two methods by which the learners can answer the question in the Categorise widget:
- Drag and drop.
- Click on one of the answers and then click on the Move here button inside the category box.

The learners can also use the Reset button to clear all the answers and start from the beginning again.
Where can I find the Submit Button
If there isn't a quiz widget on the page, adding a new quiz widget will automatically create a quiz section. At the end of a quiz section, a submit button will be added automatically. Therefore, you don’t need to add a submit button manually anymore.
For more information on the quiz section, please refer to the article How do I use a Quiz Section?
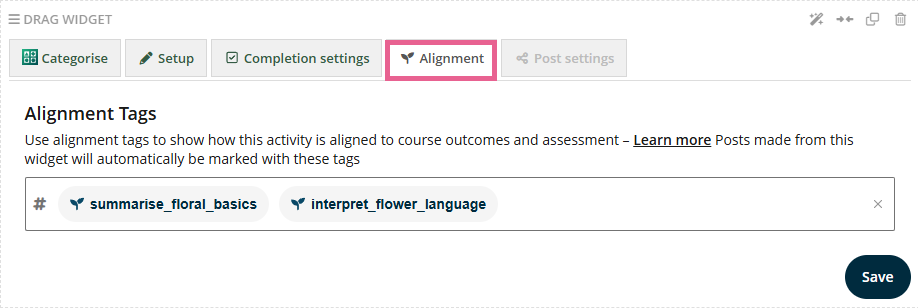
Assign course learning outcomes to the Categorise widget
You can add outcome tags for each question in the Alignment tab.
Tagging course learning outcomes (CLOs) here is an essential step in supporting the Learner Attainment Report — an exportable report available from the Assess Learners page. This report combines learner grades and CLO alignments to give educators a clearer view of learner progress.
