
LTI 1.3 Single Sign On (SSO) from WordPress
OpenLearning supports Single Sign On (SSO) from WordPress using LTI 1.3.
LTI SSO (Learning Tools Interoperability Single Sign-On) is a secure way to log in to the OpenLearning platform. With LTI SSO, you only need to remember one set of login credentials, and you can use those same credentials to log in to multiple platforms.
Please note that LTI 1.3 SSO requires configuration on both sides (the OpenLearning platform and the tool or external platform or LMS).
Required WordPress plugins
You will need to install 3 plugins in WordPress for the SSO to work with OpenLearning.
1. LTI Platform plugin documentation: https://github.com/celtic-project/wordpress-lti-platform/wiki/Installation
2. LTI Tool plugin documentation: https://github.com/celtic-project/wordpress-lti/wiki/Installation
3. celTIc LTI Library plugin: https://wordpress.org/plugins/celtic-lti/
Note: You can find these 3 plugins from the search function in Wordpress and install them directly to your site. Plugins > Add New Plugins >> enter LTI in the search field.

Configure LTI 1.3 SSO connection in Wordpress
Once the plugins are installed, please follow the steps below to configure LTI 1.3 SSO in WordPress
Step 1
In WordPress, go to Plugins and activate the 3 plugins that you installed.

Step 2
Next, go to Settings and select LTI Tools.

Step 3
In the LTI tools menu, click on Default Settings.

Step 4
Scroll down to Privacy Settings and select all of the available settings here.

Step 5
Scroll down to Security Settings and enter the Key ID and a private key. To add a private key, you can use the private key generation tool below:

Once done, click on the Save Changes button and then go back to the LTI tools main menu (Settings > LTI Tools) .
Configure Wordpress SSO Connection in OpenLearning
Before we proceed further to finalize the set up in Wordpress, we will need to set up the connection in OpenLearning to get configuration details.
Step 1
Log in to OpenLearning and navigate to your Institution Settings > Integrations.

Step 2
Scroll down to the Manage Single Sign-on (SSO) connections. Select LTI 1.3 as the connection type and click on Add new SSO connection.

Step 3
Enter the connection name and take note of the Configuration information here. You can leave this window open and open another tab/ window on the Wordpress LTI page again.

Step 4
In Wordpress, go to Settings > LTI Tool page and click on the Add New button.
Please consider one tool as one SSO connection. To create another SSO connection, you will need to add or create a new tool.

Step 5
Under General Details;
- Enter the Name and Code for this connection.
- Ensure the Enabled checkbox is ticked.
- Note: We recommend to tick the Debug Mode? checkbox as well in case you need to debug any errors on your end later but it's not required for the connection to work.
- Launch message URL (required): This will be the Target Link URI that you copied from the OpenLearning Configuration information from Step 2 above.
Example:

Step 6
Leave every other settings to it's default configuration (unless there is a custom requirement), and scroll down to LTI 1.3 Configuration.
Copy the OpenLearning Configuration information from Step 2 above to the related field in Wordpress.
- Initiate Login URL = Open ID Connect Initiation URL in the OpenLearning new SSO connection.
- Redirection URI(s) = Target Link URI in the OpenLearning new SSO connection.
- Public Keyset URL = JWK URL in the OpenLearning new SSO connection.
Example:

Step 7
Scroll down and take note of the Platform configuration details here that you will need to add into your OpenLearning SSO connection.

Step 8
Copy the Wordpress Platform configuration from Step 7 above to the related field in OpenLearning LTI 1.3 Platform configuration section.
- Issuer / Platform ID = Platform ID in Wordpress
- Client ID = Client ID in Wordpress
- Deployment IDs = Deployment ID in Wordpress
- Access token URL = Authentication request URL in Wordpress
- Authentication URL = Authentication request URL in Wordpress
- Keyset URL = Public Keyset URL
Example:

Step 9
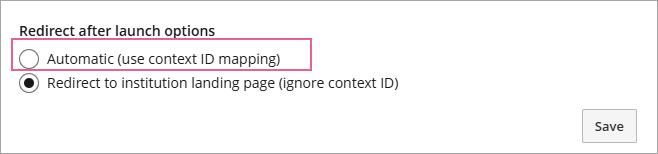
Once filled in, scroll down to the Redirect after launch option section and select the appropriate option for your connection.
- Automatic (use context ID mapping)
- Redirect to institution landing page (ignore context ID)

Note: If you set to Automatic, please refer to the section below on mapping the context ID.
Step 10
Click Save in the Openlearning SSO connection window here and the Save Changes button in the WordPress LTI tool page.

Setting the Launch button and Context Mapping
Step 1
In Wordpress, go to Pages and open up or create a new page where you want to include the LTI SSO launch link.

You can add the tool directly to the text editor or select one of the available blocks (i.e button) and link the launch link to it.

Example;

Step 2
Publish the page and the link will show up on the page.

That's it, the set up is done and you can test out the launch connection.
Context Mapping
There are two options on how you can dictate the LTI SSO link behaviours:
1. Context mapping using page ID. You can use the page ID in WordPress to dictate the link must redirect the user to a specific class in a course. However, NOTE that this means you can only use 1 LTI tool link on that page as the mapping is on the page level.
To set this mapping, you will need to:
a. In the LTI 1.3 connection that you set, click on Edit, scroll down to the Redirect after launch options and select - Automatic (use context ID mapping) and click Save.
b. Scroll up to the LTI Single Sign On Settings and select the class that you would like to map the link to and enter the WordPress page ID number in the Context ID field for that class. Then click on the Save button to apply the changes.


The page ID number can be taken from the WordPress page URL.

c. Clicking the LTI SSO link again will redirect the user to that specific class.
There is a video available for this setup type. you can watch the video below:
2. Mapping using the custom parameters in the WordPress LTI tool.

You can use the custom parameters to map the link to:
a. A specific class in a course using the format: class_id=[OL class/cohort ID].
b. A course using the format: course=[OL course ID].
Please note that if you want to use the course ID in the custom parameter, also need to register each learner to the class allocation by using either one of the API endpoints below:
1. https://api.openlearning.com/docs#/Courses/add_class_allocation_for_course
2. https://api.openlearning.com/docs#/Courses/set_class_allocations_for_course
This is because the OL platform needs to know which class to enrol the learners in. Therefore, you can use the API endpoints above to provide this information to the OL platform.

If you use the class ID, this step is not required anymore as you have provided the information on which class the OpenLearning platform should redirect the learner to.
To take into consideration when setting up LTI 1.3 SSO from WordPress
1. In the custom parameters, please ensure there is no extra space before and after the class or course format.
2. 1 WordPress LTI tool can be linked or mapped to only 1 OL SSO connection.


3. 1 WordPress LTI tool can be linked or mapped to only 1 OpenLearning class. To link to another class, you will need to create another new LTI tool in WordPress and 1 new SSO connection in OpenLearning.
4. Therefore, if you have 2 courses with 10 classes each. You will need to create 20 WordPress LTI tools and 20 OpenLearning SSO connections.
5. However, 1 WordPress LTI tool can also be linked or mapped to 1 OpenLearning course. So all learners will be redirected to that course by clicking the LTI SSO link and depending on which class he/she was enrolled in, the learner will be redirected to that class automatically.
6. By using this SSO method from WordPress, when a learner clicks the link for the first time, the login page will appear. This is used to link the incoming user (external ID) to the OpenLearning account the user wishes to use.
Please note that once the link is established, you'll need to contact the OpenLearning Customer Success (CS) team to break the link in case the learner wants to link it (learner's account in WordPress - external ID) to another account in OpenLearning. The CS team can be contacted via email at support@openlearning.com.
Troubleshooting common issues and errors
Based on your hosting policy and configurations, there is a possibility that the LTI request may be flagged as suspicious. Should this occur, you may encounter an error instead of a successful LTI launch.

If you encounter the above, please attempt the workaround below;
a) On a standard hosting, please reach out to your hosting provider to disable the mod_security setting.
b) If you are using Cloudflare, whitelist the request by adding the value below;
User-Agent: PyLTI1p3-client
Note: Please contact our Customer Success team via email at support@openlearning.com for advise and confirmation before attempting the above workarounds