
How do I add learners?

Guide: Institution roles and enrolment management
1. What is an institution on OL?
2. Understanding different roles
3. How do I add my team members?
4. How do I add learners?
5. How do learners get notified that they've been added to the institution and/or enrolled in a course?
 On this page
Adding learners to an institution makes managing them easier. If your portal is private, adding your learners is the only way they will be able to access institution courses.
How do I add learners to the institution?
There are two ways of adding learners to an institution:
- Add learners one by one.
- Add multiple learners in bulk (via CSV).
Step 1: Finding the Manage learners section

Go to Institution settings > People > Manage learners.
Step 2a: Adding learners one by one
- Go to the Add learners tab.
- Enter each learner’s email address in the Add learners by email box.
Separate email addresses with a comma if you are adding more than one learner.

You will be presented with a table, where you can enter details such as the learner’s group, institution id, and full name.
Optional: You can also create accounts for the learners by checking the "Automatically create accounts and email them their password".

Step 2b.1: Adding learners in bulk for the same course and class
- Download the CSV template to your computer.

- Fill in the CSV with learner information

Be sure to save this file before closing and uploading it.
Don’t forget to click Add learners when the upload is done.

Step 2b.2: Adding learners in bulk for different courses and classes
You can use this method if there is a requirement to add learners in bulk but for different courses and classes.
- Go to the Enrol learners to courses tab.
- Download the Class Path CSV file to your computer.

Note: You can select to download the Class Path file for all courses or specific classes that suit your requirements.

The Class Path CSV file contains the Course Name, Course Path, Class Name, and Class Path data. The Class Path column is the one you are interested in whereas other data can be used to ensure that you have selected the correct Class Path value.

- Download the Sample Format CSV template to your computer.

- Fill in the CSV template with Class Path and User ID information. User ID can be the learner’s email address or profile name.

Be sure to save this file before closing.
- Once the file is saved, the next step is to upload the file using the Upload enrolments feature.

How to know if you added the learners successfully
There are two ways of knowing if you’ve successfully added learners:
- An alert will let you know you’ve added X number of learners every time you save.
- You can check the record under the Recently added learners section in the Enrol learners to courses tab.

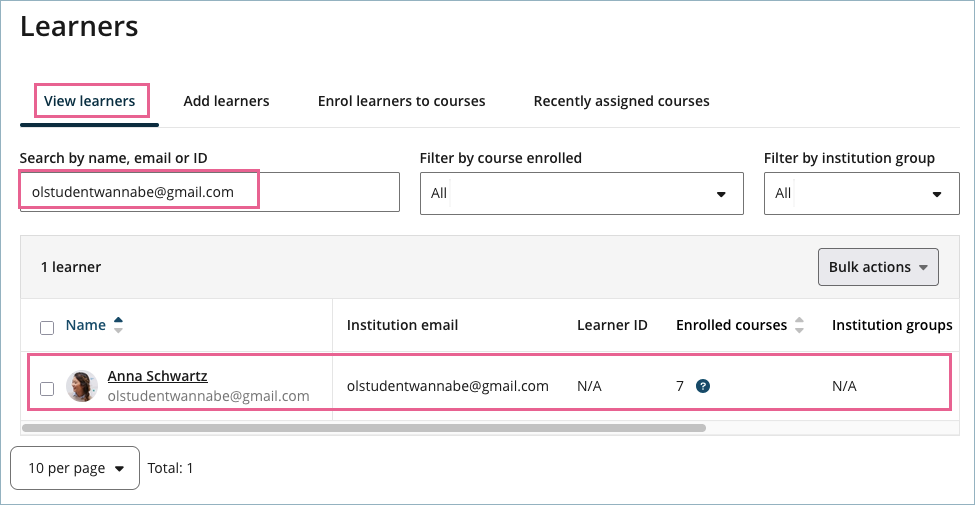
- Check learners under the View learners tab and search by name
How do I add existing learners to courses?
Step 1
Go to the View learners tab.
Step 2
- Check all the learners you want to enrol.
- Go to Bulk actions and choose Enrol in courses.
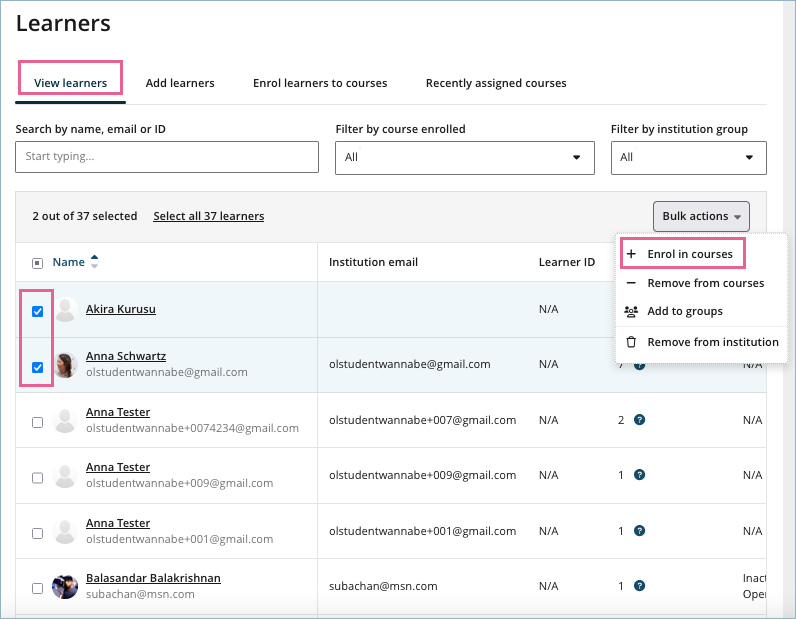
- Select the course(s).
- Finally, select the class and click Assign to courses.

Can I add learners to an institution and a course in one go?
Yes, you can.
Step 1
Follow the steps described in 2a or 2b.1 or 2b.2 within the section How do I add learners to the institution to add the learners manually using the email addresses or via CSV upload.
Step 2
Tick the Enrol these learners into courses option to display the Select Courses drop-down menu.

Step 3
Click on the dropdown menu under Select Courses, and choose the course and the class.

Step 4
Once done, click the Add Learners button to add the learners to the institution and the courses in one go.
My learners don't have accounts yet. Can I create accounts for my learners?
Yes! Simply follow the steps described in How do I add learners? and make sure you check the "Automatically create accounts and email team members their password" box and click on Add learners.

How do I remove a learner from courses?
- Select the learner from the table under the View learners tab
- Click on Bulk actions.
-Select Remove from courses and choose the course(s) you want to unenroll the learner from.

How do I remove a learner from the institution?
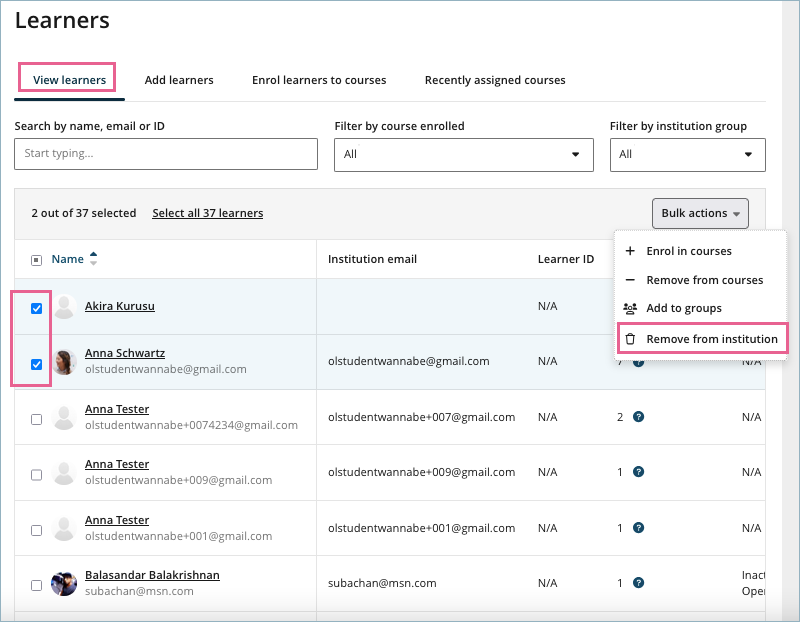
- Go to Institution settings > People > Manage learners > View learners.
- Select the learner from the table.
- Click on Bulk actions.
- Choose Remove from institution.
You will be asked to confirm if you want to remove the learner.
How do I remove a learner from the institution completely? How do I delete a learner's account?
Remove a learner from the institution and all courses to make sure they are completely removed.
Please note, you won’t have the power to delete or deactivate another user’s account.
Only the account owner can deactivate their own account. (How do I deactivate or reactivate my account?)
Help! I'm not an institution administrator. How can I add learners to my course?
It is possible to add one or more learners to a course without adding them to the institution. The following institution members have the power to do this:
- Course administrators
- Course facilitators
- Assessment designers
- Assessors
 Note:
Note:
- You won’t be able to create accounts for learners not registered on OpenLearning if adding learners at the course level. Instead, their invitation email will direct them to open an account.
- Private portals require everyone accessing institution courses to be a member of that institution. You can invite them at the course level, however, they will only be able to access the course if they had previously been added to the institution.
What’s the difference between primary email and institution email?
The primary email is marked by A and the institution email is marked by B in the screenshot below:
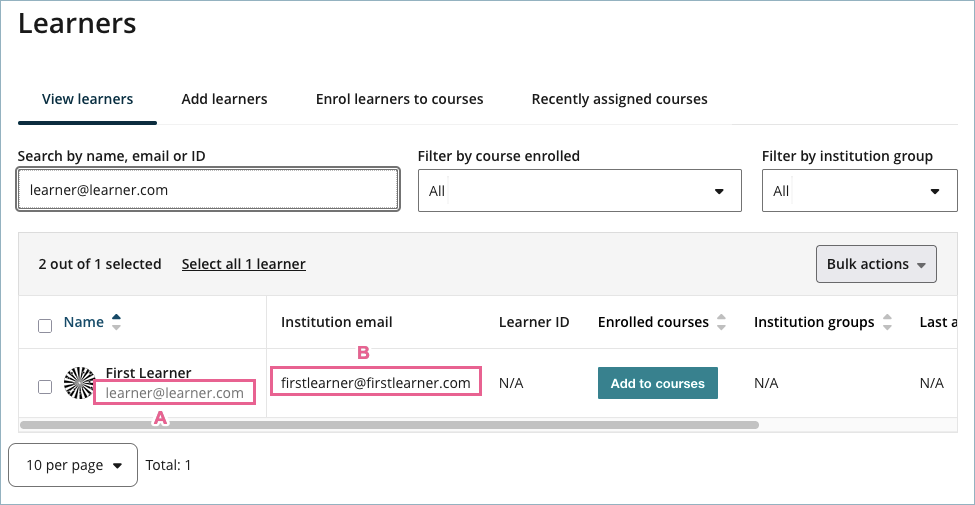
The user’s primary email is the email that the user has selected when creating an OpenLearning account.
Institution email is the email that the institution administrator has selected to invite the learner to an institution.
When an institution administrator is inviting a learner for the first time using an email, the same email will be displayed on both primary and institution email.
However, when the learner has changed the email to another email using the account settings menu (for more information please refer to the article How do I update my email address?), the new email will be displayed on the primary email. However, this will not affect the institution email and it will still be displaying the old email. The reason is that the institution might still need the old email information as it’s used elsewhere in their other integrated systems.
How do I enrol learners into a program?
There are currently two main ways to enrol learners into a program.
1. Enrol learners from the “View Learners” tab and table
This method is similar to manually adding learners to courses.
Step 1
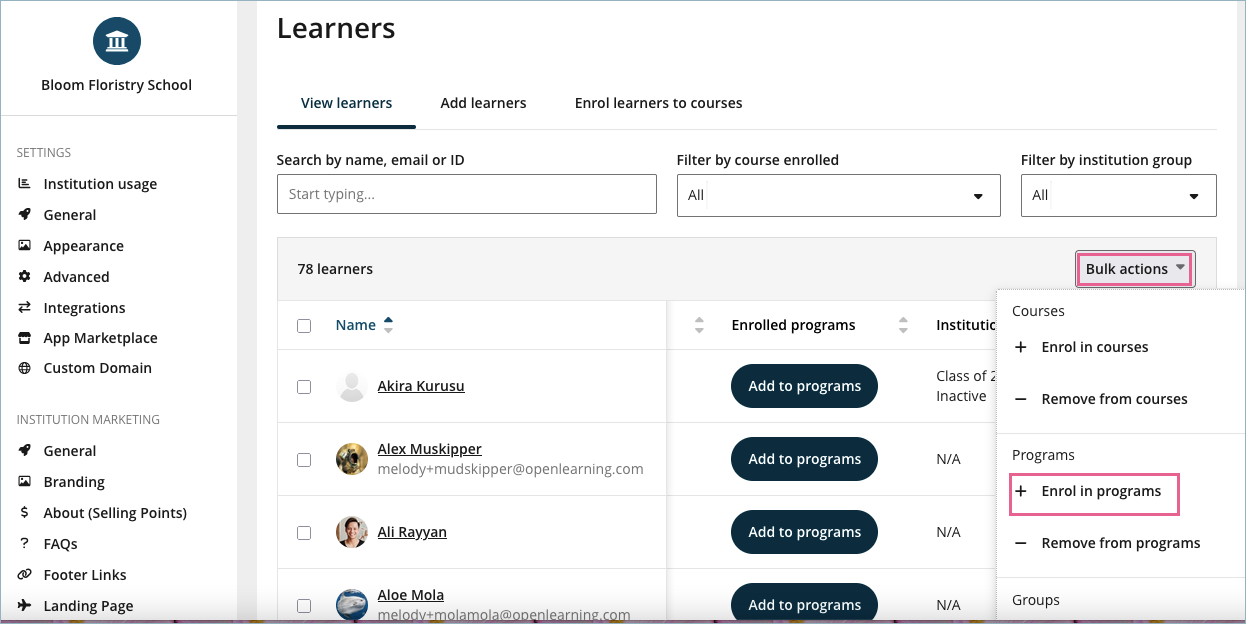
Go to the View Learners tab.
Step 2
Locate the learner in the table and, in the Enrolled Programs column, click Add to Programs.
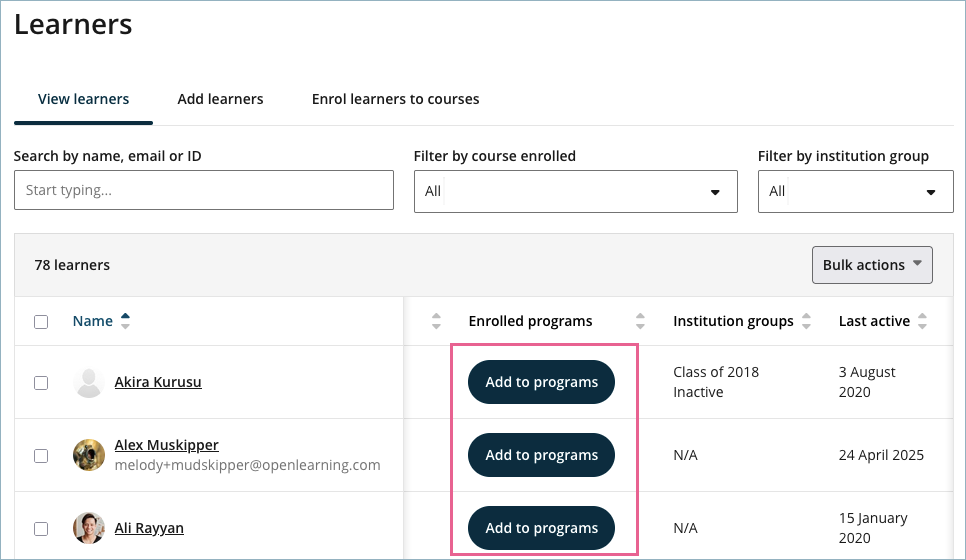
Alternatively, select one or more learners using the checkboxes, click the Bulk Actions button, and choose Enrol in Programs.
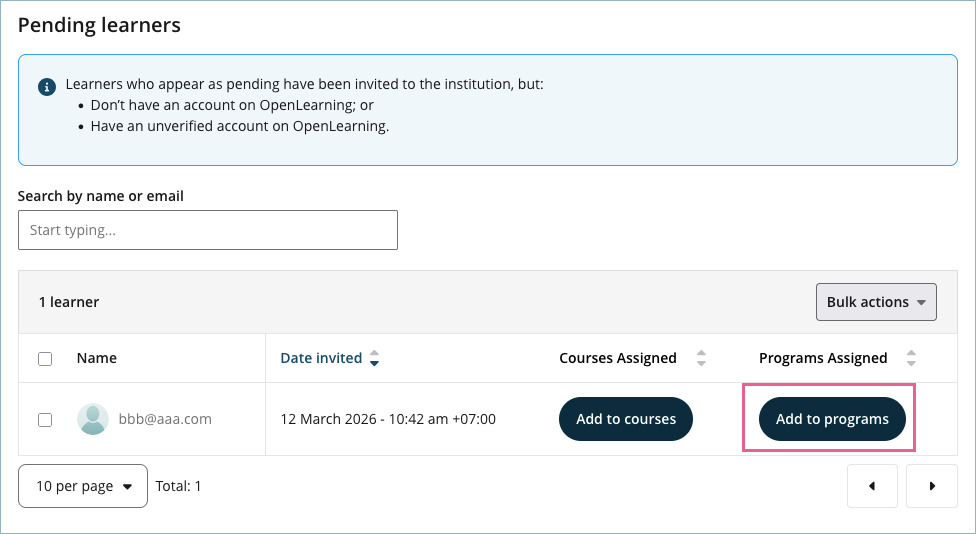
The same functionality is available in the Pending Learners table. You can use the Add to Programs button in the Enrolled Programs column to enrol pending learners into programs as well.
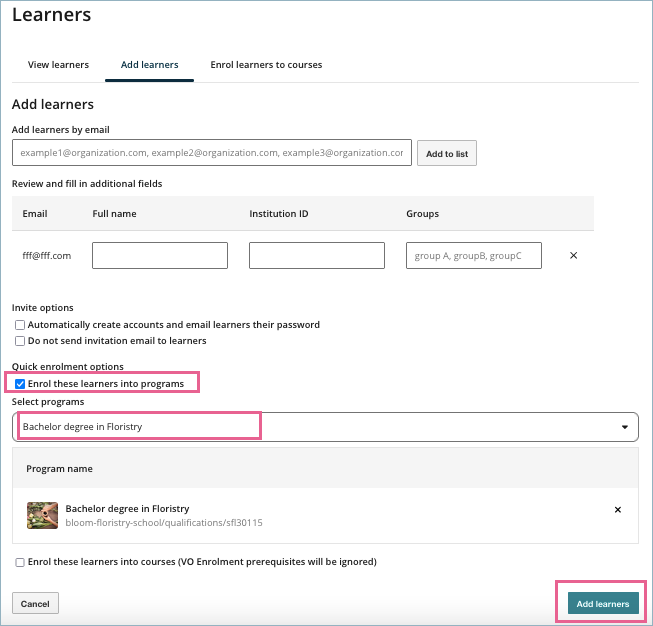
2. Enrol learners during the “Add Learners” flow (Quick Enrolment)
Similar to the existing quick enrolment options for courses, you can now enrol learners into programs while inviting them to the institution.
Step 1
Follow the steps in Step 2a: Adding learners one by one, but do not click the Add Learners button yet.
Step 2
To enrol learners in programs, select the Enrol these learners into programs option. Then choose one or more programs from the dropdown menu and click the Add Learners button.
The learners will be:
invited to the institution, and
enrolled in the selected program(s).
What does it mean to enrol someone in a program?
Enrolling a learner in a program:
Registers the learner as part of that program.
Records that they are expected to complete the courses within the program structure.
However, enrolling a learner in a program does not automatically enrol them in the courses within that program. Learners will still need to join the individual courses themselves.
You can think of program enrolment as placing the learner in a waiting room for the program’s courses. They are enrolled in the program, but they have not yet joined as learners in the individual courses (e.g. Course A, B, C, D).
How can educators see whether the learners have joined a program?
Educators can check whether learners have joined the courses within their program by navigating to Data > Learner Data > Program Data. For more information, please refer to the following documentation: What learner data is available within the institution?
Why aren’t learners automatically enrolled in courses?
Some courses include complex prerequisite rules or sequencing requirements. To maintain flexibility and prevent unintended enrolments, the following approach is used:
Manual program enrolment by educators.
Learners joining courses at the appropriate time.
This approach allows institutions to maintain control over enrolment logic while program-level tracking is being introduced.